Introduction
As a photographer, I’m always on the lookout for ways to save money so I can buy more photography gear. It’s never-ending, right? And I don’t want to give Adobe all my money all the time. So, I’ve decided to give Pixelmator and Photomator a try. After all, I’ve already spent a fortune on Adobe, why not spend $49.99 for Pixelmator and $74.99 for Photomator and give them a shot? And guess what? These are lifetime licenses. Once you buy them, you’re good to go for the rest of your life. Haha!
Photomator is basically my go-to for Lightroom. I use it as my pipeline to get my photos edited together with Pixelmator, which is like my Photoshop substitute. In the coming chapters, I’ll show you my workflow/pipeline to get my photographs from memory cards all the way to the finished product.
For this exercise, we’re using a memory card from my camera with a collection of wildlife images I took during an outing in the woods.
Hardware and Software
In this section I will list the hardware I use, together with the software we will be using for this tutorial. Keep in mind this is not in any way that I am promoting this stuff, it is basically what I use at my studio. You can replace the hardware section with wherever hardware you like. By hardware I mean editing computer, NAS Server, Camera equipment.
Let me list what I use for my photography studio:
Hardware
- Apple MacBook Pro (M2) with 64 GB of RAM and 1TB hard drive
- Samsung Monitor 27 inch monitor.
- Wacom Intuos Pro PTH-851.
- Synology DiskStation DS620SLIM NAS with 4 TB space.
- Fujifilm X-H2 with XF-33mm 1.4, XF-50-140mm 2.8, XF-150-600mm lens.
Software
- Photomator
- Pixelmator
And there it is. Now that we know what I am using, lets go over my pipeline for editing photographs.
Before We Start
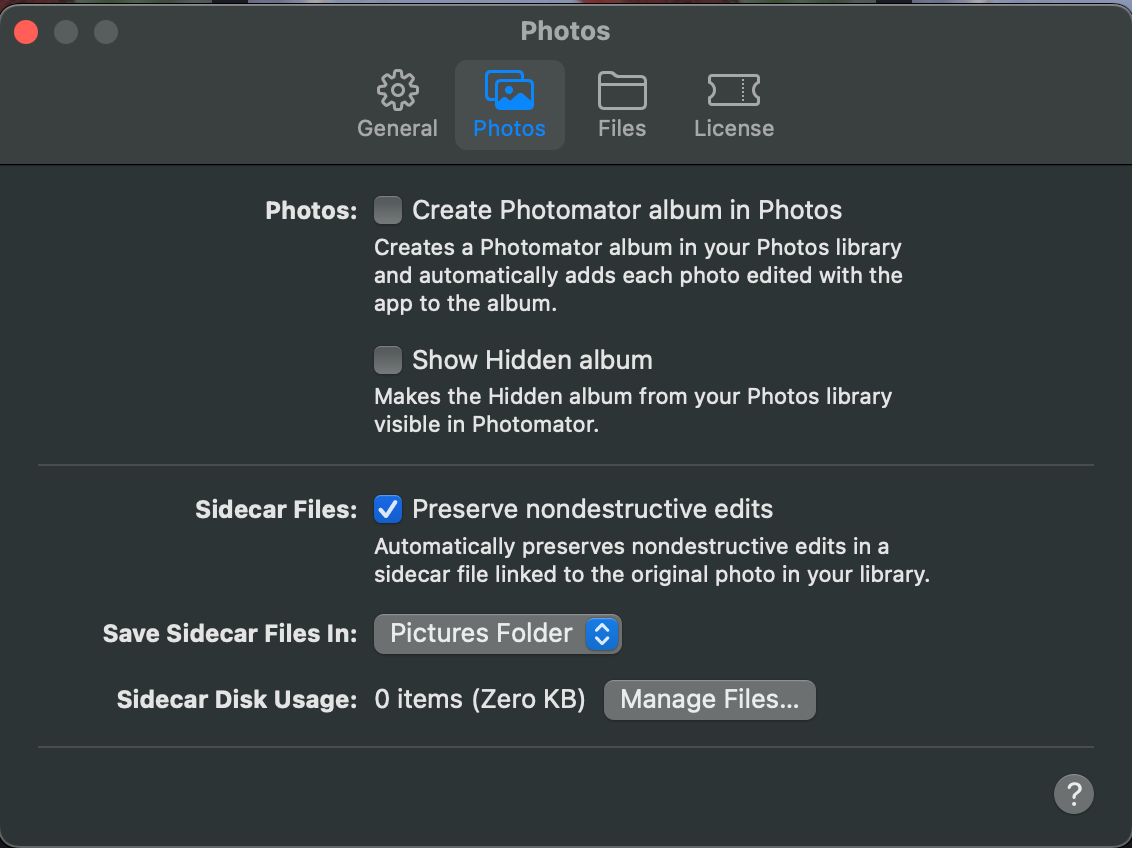
By default Photomator saves files to your iCloud, since I edit lots of pictures I really don’t mind about that. I prefer to save pictures locally to my pictures folder. For this reason I made these changes to the Photometer’s settings. Open settings by clicking ⌘, or by going to the Photomator menu and then settings. Once the settings opens, make sure to uncheck the Photos boxes “Create Photomator albums in photos” and “Show hidden album”. Also, switch the Save Sidecar Files in: “Pictures Folder”.
After this, I will create a photomator folder inside my Pictures Folder so I can place my pictures in there.
Photography Pipeline
In this section I will explain my photography editing process from beginning to end using the above softwares, Photomator and Pixelmator.
I am not going to sugar coated, Photomator is no Lightroom and it will take some time to get used to it. But hey, we are here to safe money right?
Lets get started…
Since it is faster to edit photos while they are in my MacBook, I will extract photos from memory card to the local pictures folder instead of into the Synology NAS server.
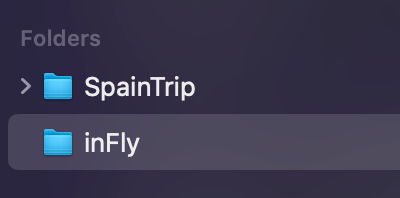
In the Pictures folder I created two folders, one called “inFly” and the other one called “processed”.
1. Copy photos from memory card to local path /Users/awesomeuser/Pictures/photomator/inFly/
2 Once all raw photos are in the inFly folder, import all photos into Photomator. I can do this in different ways; one way is to drag and drop the inFly folder into Photomator. Another way is to do ⇧⌘I and select the inFly folder and hit the import button.
3. Once the folder with the photographs is imported, you should see in Photomator on the left hand side, under folders one called inFly.
4. Once the pictures are all imported, I can start the process of selecting the pictures I’d like to keep. Sometimes in an event I can take hundred if not thousand of pictures. It is good to have a process to select what I call keepers and discard the others.
5. Photomator has a rating system where you can mark pictures from zero to five stars. Of course five stars will be the preferred ones. You can use this system to select which one are more favorite to keep. I don’t like this way of selecting keepers, but luckily Photomator has another way which I like more. This is the flag system. Let's use this.
6. You can go through each picture and flagged, rejected or unflagged. I like to flagged the keepers as it puts a neat little red flag icon on the top right corner of the picture. You can use the rejected flag if you like. You can use the buttons on the top right to flag and reject, or use the shortcut letter Z for flagged, X for rejected and U for unflagged.
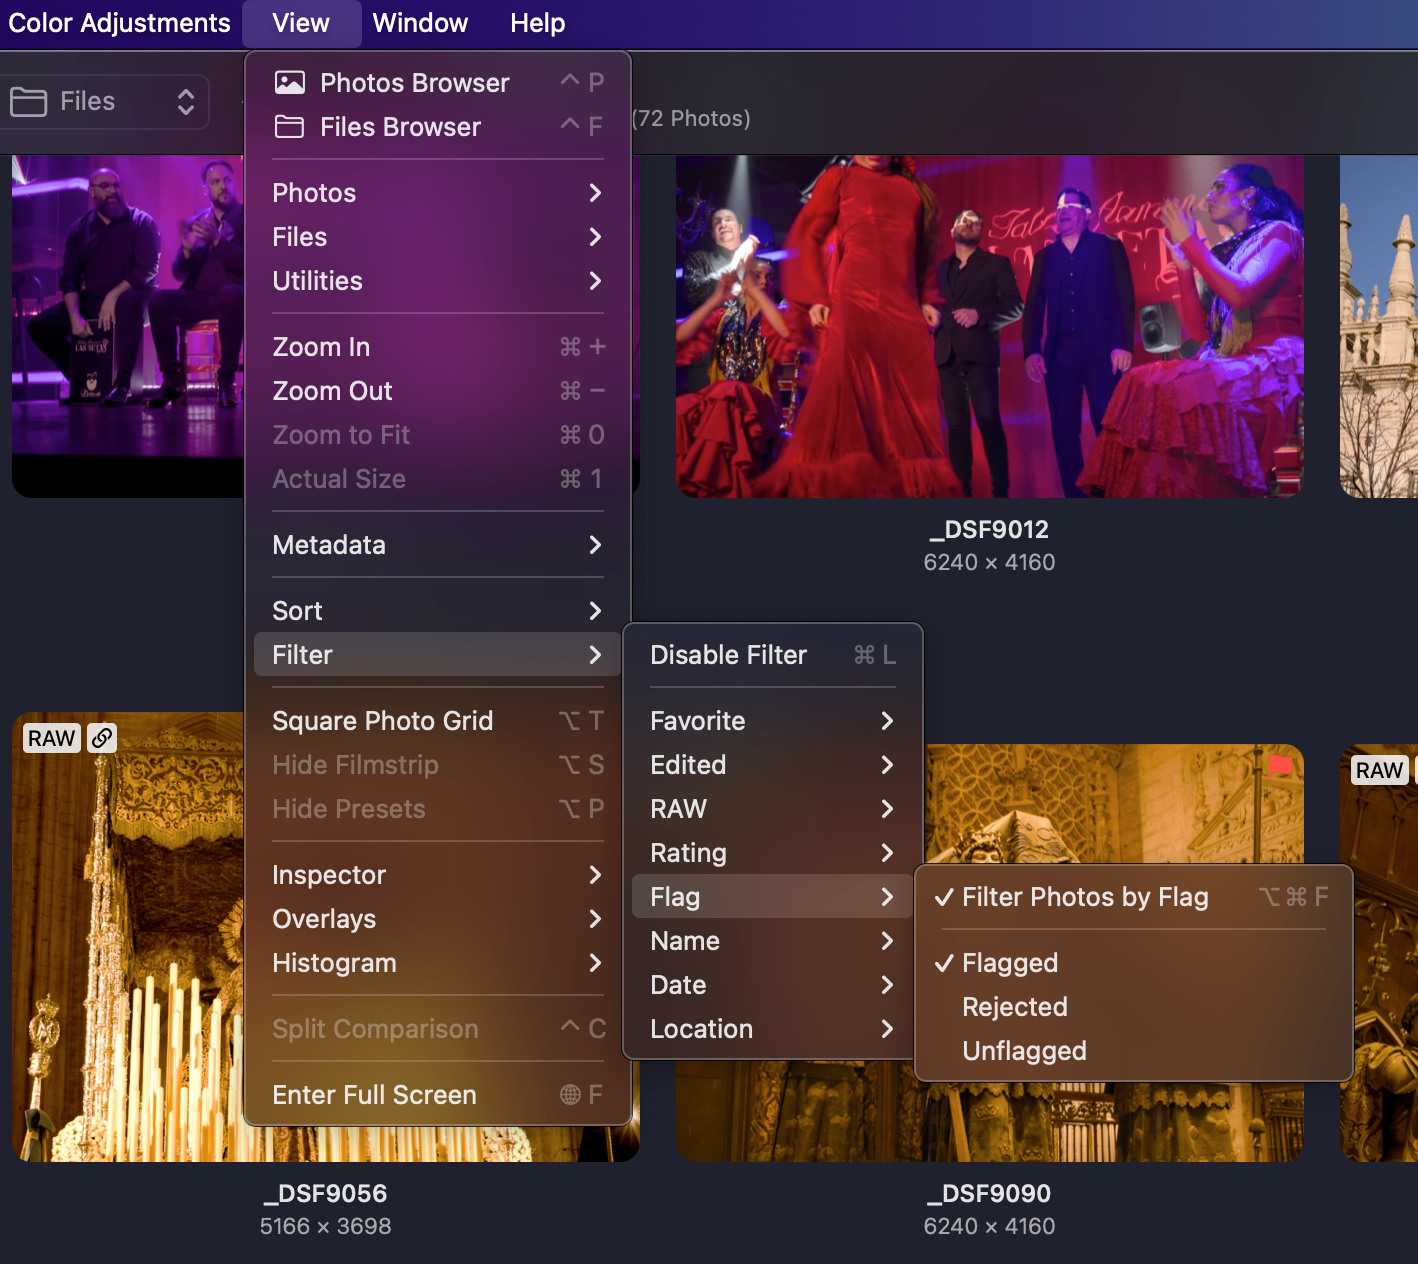
7. Once you went through all your pictures and flag the ones to keep or reject, then we can proceed to use the Filter menu to only see the ones that you rejected or flagged.
8. Goto the View-Filter and click on Enable Filter if it is not enable already.
9. Once you do the above go back to the View-Filter-Flag menu and click on “Filter Photos by Flag”. This will allow you to see only the pictures you want. For example if you want to see only the ones you flagged, select Flagged on the Filter Photos by Flag menu.
10. Once you culled all the ones you don’t want to keep, proceed to edit your favorite pictures.
11. I usually “Export as Jpeg” once I am done editing a photo. I will place the exported photo in my local path /Users/awesomeuser/Pictures/photomator/processed/
12. I continue to repeat step 11 until all my favorite photos are edited and exported.
13. After all photos are edited to my liking, I proceed to move both the original raw images and the edited Jpegs to the NAS server.
14. Here is the folder structure of my NAS server: /Volumes/Photography/Sources/Imports/PhotographyByawesomeuser/genre/year/ This is where I place raw images for safe keeping
15. This is the folder path for processed/edited photos /Volumes/Photography/Sources/Exports/genre/year/date/
16. After all images are moved out of my MacBook into my NAS server, I can delete the photos from my local pictures folder.
As you can see, is not a perfect pipeline but it is possible to migrate out of Adobe Lightroom. In my personal opinion, I think it's worth the effort. As I get more familiar with both Photomator and Pixelmator, I will probably like them more. I am also looking forward to see what apple is going to do with these tools now that they bought them.